Configure Billing for Programs
⚠️ The default currency of the Program pricing list is inherited from the Super School general settings.
-
To open the Program Pricing List page, click the 'Pricing List' button in the context menu of a particular Program.
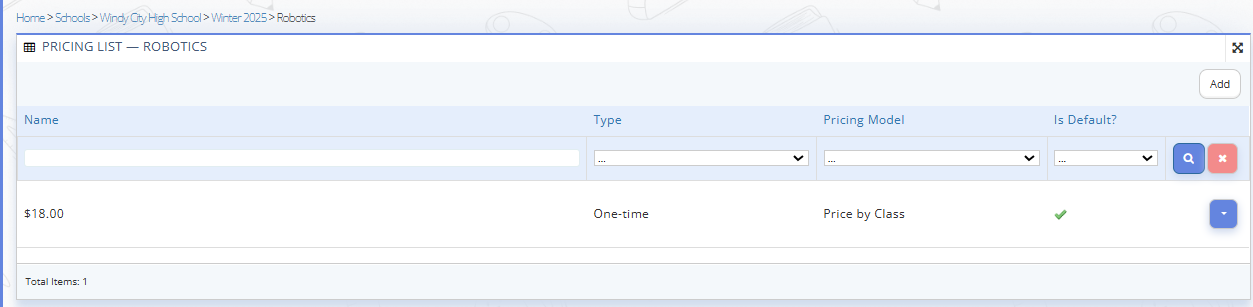
Fig. 1. New Program Pricing List -
Program pricing list page includes:
- Billing options list: The billing option that is set up in the Program Template.
- 'Add' Button: Allows to add a new Program Billing.
- Manage Billing Options: Each Program Billing in the list can be edited or removed.
Pricing Types and Models
-
Recurring
A payment that is charged automatically on a regular basis at defined intervals (for example, weekly or monthly) for as long as the program participation continues. -
One-time payment
A single payment for a program or session with no further automatic charges.
It further splits into the following models:- Fixed
A set amount charged per billing period or for the entire program, regardless of the number of classes.- Price by class
The cost is calculated based on the number of classes — the total amount depends on how many classes are included in the program. -
Free
Participation in the program is free of charge, and no payment is collected from parents.
THe Program Pricing List is inherited from that one added in the Program Template. If the Admin needs to add a new Program Pricing List, which differs from the one that was set up as a default in the Program Template, it is required to uncheck the box on the currently active default pricing list and follow the instructions below:
-
To add a New Program pricing list, click 'Add' button, and then fill in all required fields in the opened 'Add' window:
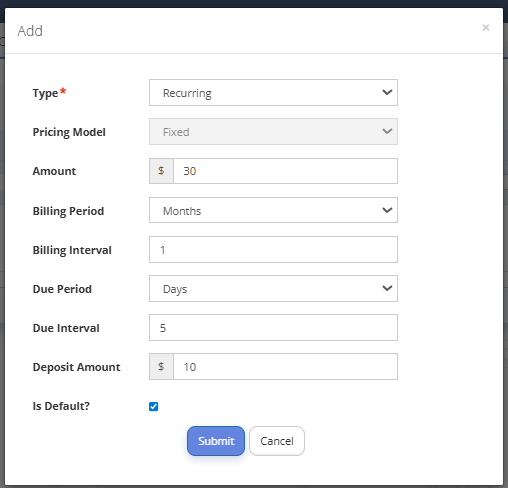
Fig. 2. Adding New Billing
- Type
Defines how the fee is charged: recurring, one-time, or free.
- Pricing model (for One-Time Payment type)
Specifies how the price is calculated: a fixed amount or based on the number of classes.
- Amount
The total amount to be charged per period.
- Billing period
Determines the unit used for recurring billing (weeks or months).
- Billing interval
Sets how often the billing occurs (e.g., every 1 or 2 periods).
- Due period
Defines the time unit for the payment due date (days, weeks, months, or years).
- Due interval
Specifies how many periods after billing the payment is due.
- Deposit amount
An upfront amount that must be paid before the program starts.
- Is Default?
Indicates whether this pricing option is applied by default. -
Click “Submit”.
Split Payments
The Split Payment feature allows schools to offer a two-part payment option for program fees, enhancing flexibility for parents.
⚠️ This option is applicable for one-time fixed/per class pricing models. It can include discounts.
To configure Split Payment (Two-part Payment):
- Navigate to Programs → Schools and select the required School.
- Click the context menu on the right to the particular school and click the “Session”.
- Select the required session and click “Edit” in the context menu on the right.
- Complete the required fields in the “Edit” window.
Fig. 3. Configure Split Payment
The Edit Session window includes the fields for configuring the Split Payment feature: - Enable Two-Part Payment: Checkbox the Two-Part Payment option checked or unchecked. - First Payment (%): Defines the percentage of the total fee required for the first payment. - Second Payment Date: Specifies the due date for the second payment. - Click "Submit".
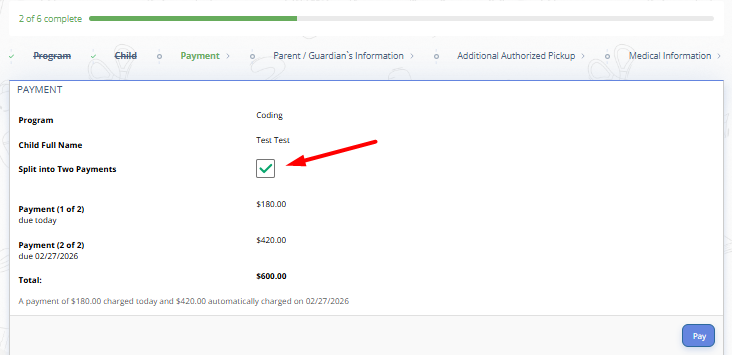
Fig. 4. Example of the Split Payment Option Display while signin up for the Program
Session Discounts
The Discount Feature allows schools to offer discounted rates for programs during specific periods, and automatically applies to parents registering their child(ren) for Programs of the specific Program Sessions (e.g. Winter 2025).
A 20% discount is applied when registering for 2 programs within the same session, and a 30% discount is applied for 3 or more programs. These discounts are valid for both siblings and multiple registrations for the same child under the same parent account, regardless of the payment method.
To enable a Discount:
- Navigate to Programs → Schools and select the required School.
- Click the context menu on the right to the particular school and click “Session”.
- Select the required session and click “Edit” in the context menu on the right.
- Complete the required fields in the “Edit” window:

Fig. 5. Configure Discount
The “Edit” window includes three fields for configuring discounts:
- Enable Discount: Checkbox the Discount option checked or unchecked.
- Discount Start Date: The date when the Discount becomes active.
- Discount End Date: The date when the Discount expires. - Click “Submit”.
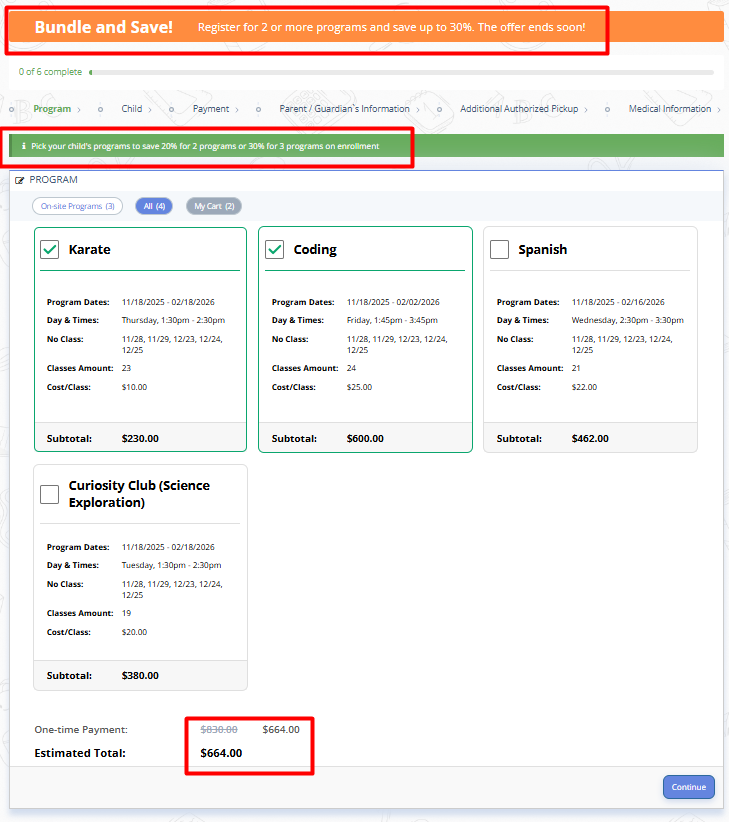
Fig. 6. Example of the Discount Display